How to Make Award-winning Homemade Chocolate Icing (4 ingredients)

How to Make Award-winning Homemade Chocolate Icing (4 ingredients)

Homemade Chocolate Icing (4 ingredients).

Homemade Chocolate Icing (4 ingredients)

Hey everyone, it is Louise, welcome to our recipe site. Today, I will show you a way to make a special dish, homemade chocolate icing (4 ingredients). It is one of my favorites. For mine, I'm gonna make it a bit tasty. This will be really delicious.

Homemade Chocolate Icing (4 ingredients) is one of the most well liked of recent trending foods on earth. It is enjoyed by millions daily. It's simple, it's quick, it tastes delicious. They are nice and they look fantastic. Homemade Chocolate Icing (4 ingredients) is something which I've loved my entire life.

To get started with this particular recipe, we must first prepare a few components. You can have homemade chocolate icing (4 ingredients) using 4 ingredients and 5 steps. Here is how you can achieve it.

The ingredients needed to make Homemade Chocolate Icing (4 ingredients):

  1. {Make ready 1 1/4 cup of powdered sugar.
  2. {Take 1/8 cup of milk.
  3. {Take 1/8 cup of cocoa.
  4. {Take 2 tbsp of butter.

Steps to make Homemade Chocolate Icing (4 ingredients):

  1. Melt butter..
  2. Mix melted butter and all other ingredients in large mixing bowl..
  3. Beat with handmixer until smooth.
  4. Enjoy!.
  5. Makes enough for 12 cupcakes. Double recipe for entire cake or 24 cupcakes..

So that is going to wrap this up with this special food homemade chocolate icing (4 ingredients) recipe. Thanks so much for your time. I am sure you will make this at home. There is gonna be interesting food at home recipes coming up. Don't forget to save this page in your browser, and share it to your family, colleague and friends. Thanks again for reading. Go on get cooking!

Steps to Make Perfect Jumbo stuffed shells with ground beef & spinach!

Steps to Make Perfect Jumbo stuffed shells with ground beef & spinach!

Jumbo stuffed shells with ground beef & spinach!.

Jumbo stuffed shells with ground beef & spinach!

Hello everybody, hope you're having an incredible day today. Today, I will show you a way to make a distinctive dish, jumbo stuffed shells with ground beef & spinach!. It is one of my favorites. For mine, I will make it a little bit tasty. This is gonna smell and look delicious.

Jumbo stuffed shells with ground beef & spinach! is one of the most popular of recent trending foods on earth. It is simple, it's fast, it tastes delicious. It's appreciated by millions every day. They are fine and they look fantastic. Jumbo stuffed shells with ground beef & spinach! is something which I have loved my whole life.

To get started with this recipe, we must prepare a few components. You can have jumbo stuffed shells with ground beef & spinach! using 12 ingredients and 13 steps. Here is how you can achieve it.

The ingredients needed to make Jumbo stuffed shells with ground beef & spinach!:

  1. {Make ready 1 cup of chopped onion.
  2. {Make ready 1/2 of chopped garlic.
  3. {Get 1 cup of chopped green pepper.
  4. {Get 1 of bag of FROZEN spinach.
  5. {Get 1 lb of ground beef.
  6. {Make ready 1 box of jumbo or regular sized shells.
  7. {Make ready pinch of of salt.
  8. {Get 1 can of tomato sauce or spaghetti sauce.
  9. {Get 1 can of crushed tomatoes.
  10. {Take 1 of 1/2 bags of mozzarella cheese/ cheddar.
  11. {Get 10 oz of cream cheese.
  12. {Get 1 of eggs.

Instructions to make Jumbo stuffed shells with ground beef & spinach!:

  1. Put ground beef on stove medium heat make sure its good and brown. Then drain grease..
  2. While cooking meat chop the onions, green peppers, and garlic..
  3. Preheat oven to 350.
  4. Boil jumbo shells in medium heat untill shells are tender..
  5. add frozen spinach in pan cook on medium for about 3 mins. Now get the cream cheese and put in microwave till soft. (Easier to stir).
  6. Big mixing bowl add meat then egg then mix. Add cream cheese, onions, green peppers, garlic, half a bag of mozzarella cheese then mix. Then add spinach and mix..
  7. Get pans add some tomato sauce to the pans.(not all of it).
  8. Get the cooked shells and stuff them with the meat. And place in pan..
  9. Now use the Crushed tomatoe sauce and pour over the stuffed shells. Then use the remaining tomatoe or the spaghetti sauce..
  10. Now sprinkle the rest of the mozzarella cheese over the shells..
  11. Get foil and cover pan and put in oven..
  12. Cook for 30 mins so the cheese is good and melted. Cheesy rice broccoli or plain broccoli is a good side!.
  13. Update* i did use this meat for another recipe so if you have some left over :D https://cookpad.com/us/recipes/349435-healthy-meatspinach-spaghetti.

So that's going to wrap this up with this special food jumbo stuffed shells with ground beef & spinach! recipe. Thanks so much for your time. I'm sure that you can make this at home. There's gonna be interesting food in home recipes coming up. Don't forget to save this page in your browser, and share it to your family, friends and colleague. Thank you for reading. Go on get cooking!

Recipe of Homemade "Ropa Vieja" (Shredded beef- panamanain style)

Recipe of Homemade "Ropa Vieja" (Shredded beef- panamanain style)

"Ropa Vieja" (Shredded beef- panamanain style).

"Ropa Vieja" (Shredded beef- panamanain style)

Hey everyone, it's Brad, welcome to my recipe page. Today, I'm gonna show you how to prepare a distinctive dish, "ropa vieja" (shredded beef- panamanain style). One of my favorites food recipes. For mine, I'm gonna make it a bit tasty. This is gonna smell and look delicious.

"Ropa Vieja" (Shredded beef- panamanain style) is one of the most favored of recent trending meals in the world. It's enjoyed by millions daily. It's simple, it is quick, it tastes delicious. They are fine and they look wonderful. "Ropa Vieja" (Shredded beef- panamanain style) is something which I have loved my whole life.

To begin with this particular recipe, we have to prepare a few components. You can have "ropa vieja" (shredded beef- panamanain style) using 10 ingredients and 9 steps. Here is how you cook that.

The ingredients needed to make "Ropa Vieja" (Shredded beef- panamanain style):

  1. {Take of cooking wine.
  2. {Take of tomatoes.
  3. {Make ready of beef (brisket or similar - tasty and easy to tear apart or shred).
  4. {Make ready of onion (i prefer to add 1/2 or 1tsp powdered).
  5. {Get of tomato paste (4oz or 113g).
  6. {Get of salt n pepper (to taste).
  7. {Prepare of garlic, minced (or garlic powder).
  8. {Make ready of bell pepper (you can play with the colors, but green is whats usually used for this).
  9. {Take of vegetable oil.
  10. {Take of sugar (or just enough to lower the acid).

Instructions to make "Ropa Vieja" (Shredded beef- panamanain style):

  1. Cook the brisket on boiling water until soft and tender. Seasoned the water with salt, garlic and onion (if using powder), pepper. I usually leave it like 1-2 hours..
  2. Once its cooked, remove it from pan and let it cool. Separate or tear out the meat. Dice tomatoes in small cubes, and bell pepper too..
  3. On a frying pan, add ur vegetable oil and put your tomatoes and bell pepper (if u're using garlic cloves and onion instead of powder u should add them now too). I like to squeeze tomatoes with a fork to get all the juices and flavor..
  4. Add your brisket on the pan and stir with veggies. Add the tomato paste and the cooking wine. Let it boil, add the sugar and taste it in case it needs more salt or seasoning..
  5. Add enough beef broth (water left from cooking ur beef) to the sauce. Cook it until sauce is ready and thickened..
  6. Serve and enjoy!.
  7. ** This is our traditional version of a very popular dish in Panama, and other countries like Colombia and Venezuela. I have tried it also with chicken and pork and tastes good too!.
  8. This is great served with white rice or rice and lentils with a simple salad, but i prefer it with caramelized ripe plantains for that sweetness touch (great flavor contrasts in ur mouth).
  9. You can also do pita pockets with your leftovers (which i do all the time and will share recipe later); or serve it with corn tortillas (not the mexican style but the ones similar to "arepas" that are fried) for breakfast or as snack..

So that's going to wrap it up for this exceptional food "ropa vieja" (shredded beef- panamanain style) recipe. Thank you very much for reading. I'm sure you will make this at home. There's gonna be more interesting food at home recipes coming up. Don't forget to save this page in your browser, and share it to your loved ones, colleague and friends. Thank you for reading. Go on get cooking!

Easiest Way to Make Ultimate Microwave chocolate cake (Leonie)

Easiest Way to Make Ultimate Microwave chocolate cake (Leonie)

Microwave chocolate cake (Leonie). This is my own version of the chocolate microwave mug cake. Edwina Hanslo's delicious and super quick chocolate cake with a creamy ganache is the perfect choice for busy mums. The chocolate cake is made from dark chocolate (no cocoa powder here!), with a generous smooth peanut butter core.

Microwave chocolate cake (Leonie) This Chocolate Cake Made in the Microwave is moist, fudgy, and packed with chocolate and can be made in MINUTES. Bake an entire cake in the microwave for a birthday or party, or make fun personal cakes in a coffee mug for a great after dinner desert. The following recipes are for a family sized chocolate cake, or a microwave chocolate mug cake that bakes in under a minute; creative frosting ideas follow the.

Hey everyone, I hope you're having an amazing day today. Today, I will show you a way to prepare a distinctive dish, microwave chocolate cake (leonie). One of my favorites. For mine, I'm gonna make it a little bit tasty. This will be really delicious.

Microwave chocolate cake (Leonie) is one of the most well liked of recent trending meals in the world. It's appreciated by millions every day. It is easy, it's quick, it tastes yummy. Microwave chocolate cake (Leonie) is something which I've loved my whole life. They are nice and they look wonderful.

This is my own version of the chocolate microwave mug cake. Edwina Hanslo's delicious and super quick chocolate cake with a creamy ganache is the perfect choice for busy mums. The chocolate cake is made from dark chocolate (no cocoa powder here!), with a generous smooth peanut butter core.

To get started with this particular recipe, we must prepare a few ingredients. You can cook microwave chocolate cake (leonie) using 11 ingredients and 4 steps. Here is how you can achieve that.

The ingredients needed to make Microwave chocolate cake (Leonie):

  1. {Get 200 ml of flour.
  2. {Get 180 ml of sugar.
  3. {Take 15 ml of baking powder.
  4. {Make ready 2 of eggs.
  5. {Make ready 1 pinch of salt.
  6. {Take 5 ml of vanilla.
  7. {Prepare 45 ml of oil.
  8. {Get 45 ml of cocao.
  9. {Prepare 125 ml of milk.
  10. {Take 250 ml of cream.
  11. {Get 180 grams of chocolate (whole nut works good).

Chocolate Microwave Cake: A couple weeks after I figured out regular microwave cake I had a serious craving for chocolate cake. This chocolate microwave cake recipe is nearly exact to the original microwave cake, but we're subbing out a little flour for cocoa powder! This Chocolate Mug Cake is easy to make with just a few ingredients and made right in the microwave. Unsweetened cocoa powder: You can use either natural unsweetened cocoa powder or dutch-processed cocoa powder.

Instructions to make Microwave chocolate cake (Leonie):

  1. Mix everything (except cream and chocolate) together with a spoon..
  2. Microwave on high for 7 min.
  3. Melt cream and chocolate on stove.
  4. Pour over warm cake.

I've tried it with both and they each work just fine! This microwave Chocolate Mug Cake will become your new obsession; it's the easiest and fastest way to make dessert for one or two, and you wont believe how delicious it is! This mug cake recipe is made with chocolate chips and no eggs. Today, I'm sharing my favorite pampered chef lava cake recipe ! We had a get together with friends a few weeks back and I was in charge of bringing dessert for everyone.

So that is going to wrap it up with this exceptional food microwave chocolate cake (leonie) recipe. Thanks so much for your time. I am confident that you can make this at home. There's gonna be more interesting food in home recipes coming up. Don't forget to bookmark this page on your browser, and share it to your loved ones, friends and colleague. Thank you for reading. Go on get cooking!

Recipe of Homemade Chicken paratha roll with lemon cupcakes

Recipe of Homemade Chicken paratha roll with lemon cupcakes

Chicken paratha roll with lemon cupcakes. Learn how to make Chicken Paratha Roll with White Sauce (Chatni). Enjoy this homemade roll paratha with it's special white sauce and ketchup. Chicken Paratha Roll is a full meal that comprise of all the nutritional value and delicious taste.

Chicken paratha roll with lemon cupcakes Chicken Paratha Roll can be a healthy food to consume during Ramadan at iftar. In chicken gyro post I mentioned my childhood favourite paratha rolls and Karachi food. I won't hesitate to admit that most of my attempts at making these wraps were not very successful.

Hello everybody, it's Louise, welcome to my recipe page. Today, we're going to make a distinctive dish, chicken paratha roll with lemon cupcakes. One of my favorites food recipes. For mine, I am going to make it a bit tasty. This will be really delicious.

Chicken paratha roll with lemon cupcakes is one of the most well liked of current trending foods in the world. It is appreciated by millions every day. It is easy, it's fast, it tastes delicious. They're nice and they look fantastic. Chicken paratha roll with lemon cupcakes is something that I have loved my entire life.

Learn how to make Chicken Paratha Roll with White Sauce (Chatni). Enjoy this homemade roll paratha with it's special white sauce and ketchup. Chicken Paratha Roll is a full meal that comprise of all the nutritional value and delicious taste.

To get started with this recipe, we have to first prepare a few ingredients. You can cook chicken paratha roll with lemon cupcakes using 28 ingredients and 9 steps. Here is how you can achieve it.

The ingredients needed to make Chicken paratha roll with lemon cupcakes:

  1. {Get 2 of frozen paratha Rs. 80.
  2. {Take of Boneless Chicken 200 gms Rs Rs 55.
  3. {Make ready of Potato 1 large Rs 15.
  4. {Take 10 of Tikka masala Rs..
  5. {Make ready of Onion 1 medium Rs. 10.
  6. {Prepare of Carrot 1/2 cup sliced Rs. 3.
  7. {Get of Tomato 2 medium Rs. 2.
  8. {Prepare of Onion sliced 1.small Rs. 2.
  9. {Prepare of Salt to taste Rs. 0.5.
  10. {Make ready 0.5 of Salt as per taste Rs..
  11. {Make ready of Chilli flake 1/2 tbsp Rs. 1.
  12. {Get of Lemon juice 2 tbsp Rs. 5.
  13. {Make ready of Cumin 1/2 tsp Rs. 5.
  14. {Take of Termeric 2 pinch Rs. 0.5.
  15. {Get of Corn flour 2 tbsp Rs. 5.
  16. {Get of Coriander powder 1/2 tsp Rs. 4.
  17. {Take of Oil 1/4 cup Rs. 30.
  18. {Make ready of Garam masala 1/4 tsp Rs. 3.
  19. {Make ready of Homemade mayoniese 6 tbsp Rs. 20.
  20. {Get of Homemade Ketchup 2 tbsp Rs. 5.
  21. {Take of Coriander leaves for garnish 1 tbsp Rs. 2.
  22. {Get of Oil 1/4 cup Rs. 30.
  23. {Make ready of Mustard sauce 1/4 tsp Rs. 5.
  24. {Take 2 of phulka 100 gms each Rs. 20.
  25. {Prepare of Tomato 1 small Rs 1.
  26. {Prepare of Cucumber 1 small Rs. 8.
  27. {Make ready of Tomato 1 small Rs. 1.
  28. {Get of Beetroot 1/2 small Rs. 10.

You can make the most amazing filling using any kind of meat; grilled, barbequed, smoked, roasted etc but if. Make these mouth watering crispy chicken paratha rolls and don't forget to #ShareYourMeal. In bowl,add mayonnaise,sriracha sauce,garlic powder,lemon juice and mix well to combine. On paratha,add iceberg,crispy fried chicken,capsicum and drizzle prepared fusion spicy sauce and wrap.

Instructions to make Chicken paratha roll with lemon cupcakes:

  1. Add chicken, salt, lemon juice and Tikka masala in a bowl and mix well. Leave for 30 mins..
  2. Remove tomato skin and blend. Add oil in pan add onion tomato paste and cook for 2 mins..
  3. Add oil to a pan on medium heat spread corn flour on chicken and mix. Fry chicken till golden..
  4. Add all spices and cook for 2-3 minutes till oil separates. Add potato and Peas and cook for 5 minutes..
  5. In other pan add Maya, ketchup, mustard paste, carrot, onion, tomato and little bits of salt. Mix well set aside..
  6. Fry frozen paratha put on butter paper add salad dressing and fried chicken and roll it..
  7. Add 2 cups water and cook till potatoes and Peas become soft..
  8. Serve with salad and phulka roti..
  9. Serve with ketchup and lemon cup cakes which recipe I have uploaded before..

Any cooked chicken, either leftover or made from scratch. I like to use this Tawa Chicken for my filling: Tawa Chicken Recipe. Drizzle some more sauce, sprinkle some chilli powder or squeeze some lemon juice if you want the rolls spicy and then roll the paratha up. Chicken Paratha roll - Did you ever make Chicken Paratha Roll at home for iftar? If you are looking for easy and quick chicken paratha roll recipe then here is one for you.

So that is going to wrap this up for this exceptional food chicken paratha roll with lemon cupcakes recipe. Thank you very much for reading. I am confident you can make this at home. There is gonna be more interesting food at home recipes coming up. Don't forget to bookmark this page on your browser, and share it to your family, friends and colleague. Thanks again for reading. Go on get cooking!

Steps to Prepare Super Quick Homemade Laugensemmel: German Pretzel
Rolls (No Lye version)

Steps to Prepare Super Quick Homemade Laugensemmel: German Pretzel Rolls (No Lye version)

Laugensemmel: German Pretzel Rolls (No Lye version).

Laugensemmel: German Pretzel Rolls (No Lye version)

Hey everyone, I hope you are having an amazing day today. Today, I will show you a way to make a distinctive dish, laugensemmel: german pretzel rolls (no lye version). One of my favorites food recipes. For mine, I will make it a little bit tasty. This will be really delicious.

Laugensemmel: German Pretzel Rolls (No Lye version) is one of the most popular of recent trending foods on earth. It is easy, it is fast, it tastes yummy. It's enjoyed by millions every day. Laugensemmel: German Pretzel Rolls (No Lye version) is something which I have loved my whole life. They're fine and they look fantastic.

To begin with this recipe, we must prepare a few components. You can have laugensemmel: german pretzel rolls (no lye version) using 11 ingredients and 14 steps. Here is how you can achieve that.

The ingredients needed to make Laugensemmel: German Pretzel Rolls (No Lye version):

  1. {Take of -- Dough ---.
  2. {Make ready 400 g of bread or all purpose flour (slightly less than 3 1/4 cups).
  3. {Make ready 1/2 tsp of instant yeast (1.6 g).
  4. {Prepare 16 g of unsalted butter.
  5. {Make ready 8 g of sea salt.
  6. {Take 225 ml of cold water (slightly more or less if needed.
  7. {Make ready of -- Baking Soda Bath ---.
  8. {Get 1 liter of water (1 quart).
  9. {Prepare 2 Tbsp of baking soda.
  10. {Get of -- Topping ---.
  11. {Get of Rough salt, sesame seeds or poppy seeds for topping.

Steps to make Laugensemmel: German Pretzel Rolls (No Lye version):

  1. Combine the flour, yeast, butter and salt in a large bowl. Mix well, then gradually pour in the cold water, mixing until the dough begins to come together. The dough should be moist but firm enough that you can knead with your hands..
  2. Turn out the dough onto a well floured surface and knead for 15 minutes until smooth and elastic. Form into a ball and return the bowl..
  3. Cover the bowl with plastic wrap or a damp tea towel and let the dough rest for 30-45 minutes..
  4. Remove from bowl to a floured working surface and divide into 8 equal sized pieces. Form each into a small round roll. To form into rolls, repeatedly fold over the outer edges of the ball into towards the center of the ball, gently pressing down. Once the bottom side is round and smooth, turn it over so the smooth side is on top..
  5. Line a baking sheet with parchment paper and evenly arrange the rolls. Lightly cover with a clean tea towel or baking cloth..
  6. Let rest in the refrigerator 8 hours. This helps the outer skin of the dough slightly dry out so it doesn't lose shape when boiling..
  7. After 8 hours when you're ready to bake, preheat the oven to 210°C/410°F..
  8. While the oven is preheating, prepare the baking soda bath to boil pretzels: Bring 1 liter/1 quart of water to a boil and add 5 teaspoons of baking soda (the ratio of water to baking soda is important! It's what gives the pretzels their distinct color and flavor)..
  9. Plop the pretzel rolls into the water 1 or 2 at a time. You don't want to crowd them. Boil for 30 seconds on one side then flip over and boil for another 30-45 seconds..
  10. Remove the boiled pretzels from the pot with a slotted spoon and place on a rack to drain for a couple minutes..
  11. While the pretzels are still wet, cut a shallow "X" shape across the top of each rolls and sprinkle with coarse salt, poppy seeds and/or sesame seeds..
  12. Arrange the rolls on a baking sheet that has been lightly greased or covered with parchment paper..
  13. Bake in the oven at 210°C/410°F. for 18-20 minutes, or until they pretzels turn a deep, golden brown color..
  14. When done, remove onto a rack and let cool for a few minutes. Serve with plenty of butter!.

So that is going to wrap this up for this special food laugensemmel: german pretzel rolls (no lye version) recipe. Thank you very much for your time. I'm sure that you can make this at home. There is gonna be more interesting food in home recipes coming up. Remember to bookmark this page in your browser, and share it to your family, colleague and friends. Thank you for reading. Go on get cooking!

Recipe of Homemade Easy Chocolate Cake

Recipe of Homemade Easy Chocolate Cake

Easy Chocolate Cake.

Easy Chocolate Cake

Hey everyone, hope you are having an amazing day today. Today, we're going to prepare a distinctive dish, easy chocolate cake. One of my favorites. For mine, I'm gonna make it a little bit tasty. This will be really delicious.

Easy Chocolate Cake is one of the most favored of current trending foods in the world. It's enjoyed by millions every day. It's easy, it is quick, it tastes delicious. They're nice and they look wonderful. Easy Chocolate Cake is something which I have loved my entire life.

To get started with this recipe, we must first prepare a few ingredients. You can cook easy chocolate cake using 13 ingredients and 8 steps. Here is how you cook it.

The ingredients needed to make Easy Chocolate Cake:

  1. {Get 2 of eggs.
  2. {Take 2 tsp of of baking soda.
  3. {Make ready 1 tsp of of baking powder.
  4. {Get 1 tsp of of baking powder.
  5. {Prepare 2 tsp of of vinegar.
  6. {Prepare 1 cup of of milk.
  7. {Prepare 1 cup of of cold coffee.
  8. {Make ready 100 ml of of vegetable oil.
  9. {Prepare 1/2 tsp of of salt.
  10. {Get 75 grams of of cocoa.
  11. {Take 250 grams of of plain flour.
  12. {Take 400 grams of caster sugar.
  13. {Take 250 grams of of plain flour.

Steps to make Easy Chocolate Cake:

  1. Preheat oven to 180°F C..
  2. Grease and flour a 23,33 cm cake tin..
  3. In a large bowl combine the flour, sugar, cocoa, salt, baking powder and baking soda..
  4. In the middle of the bowl make a hole in it..
  5. Pour the beaten eggs, milk, coffee, oil and vinegar in..
  6. Mix until smooth..
  7. Pour into prepared cake tin and bake for 35-40 mins or until a toothpick inserted comes out clean..
  8. Allow to cool for 10 mins before slicing and serving..

So that's going to wrap it up for this exceptional food easy chocolate cake recipe. Thank you very much for reading. I'm sure that you can make this at home. There's gonna be interesting food in home recipes coming up. Remember to save this page in your browser, and share it to your family, friends and colleague. Thank you for reading. Go on get cooking!

Steps to Make Any-night-of-the-week Chicken Teriyaki チキン照り焼き

Steps to Make Any-night-of-the-week Chicken Teriyaki チキン照り焼き

Chicken Teriyaki チキン照り焼き.

Chicken Teriyaki チキン照り焼き

Hello everybody, I hope you're having an incredible day today. Today, we're going to prepare a distinctive dish, chicken teriyaki チキン照り焼き. It is one of my favorites food recipes. This time, I am going to make it a little bit tasty. This will be really delicious.

Chicken Teriyaki チキン照り焼き is one of the most well liked of current trending foods in the world. It is appreciated by millions every day. It's simple, it's quick, it tastes delicious. They're nice and they look wonderful. Chicken Teriyaki チキン照り焼き is something that I have loved my entire life.

To get started with this recipe, we must prepare a few components. You can have chicken teriyaki チキン照り焼き using 5 ingredients and 4 steps. Here is how you can achieve that.

The ingredients needed to make Chicken Teriyaki チキン照り焼き:

  1. {Prepare 1 of Chicken Thigh (deboned, with / without skin).
  2. {Make ready 2 tbsp of Japanese Soy Sauce.
  3. {Take 2 tbsp of Sake.
  4. {Get 2 tbsp of Granulated Sugar.
  5. {Make ready Slices of Broccoli Florets, Pumpkin.

Instructions to make Chicken Teriyaki チキン照り焼き:

  1. Heat the frying pan with adequate of oil, skin down (if with skin), pan fried until brownish (around 3 minutes), turn to the other side and continue to pan fry until brownish.
  2. Pour the pre mix seasoning mixture (becareful because the temperature is high and the seasoning is with sake) and let the chicken absorb the seasoning..
  3. Turn to the other when you see the seasoning starting to coat on the chicken. Dish up when the gravy is reducing and thicker..
  4. Served with a bowl of rice and blanced Broccoli florets and pumpkin slices..

So that is going to wrap this up with this special food chicken teriyaki チキン照り焼き recipe. Thank you very much for your time. I am confident that you will make this at home. There is gonna be more interesting food in home recipes coming up. Don't forget to bookmark this page in your browser, and share it to your loved ones, friends and colleague. Thank you for reading. Go on get cooking!

Step-by-Step Guide to Make Award-winning Simple Squashbread

Step-by-Step Guide to Make Award-winning Simple Squashbread

Simple Squashbread.

Simple Squashbread

Hey everyone, it is Drew, welcome to our recipe site. Today, I'm gonna show you how to prepare a distinctive dish, simple squashbread. One of my favorites. This time, I am going to make it a little bit unique. This will be really delicious.

Simple Squashbread is one of the most well liked of current trending meals on earth. It is enjoyed by millions daily. It is simple, it's quick, it tastes yummy. Simple Squashbread is something which I've loved my entire life. They are nice and they look wonderful.

To begin with this recipe, we have to first prepare a few ingredients. You can have simple squashbread using 3 ingredients and 8 steps. Here is how you can achieve that.

The ingredients needed to make Simple Squashbread:

  1. {Make ready 1 lb of Self-rising flour.
  2. {Get 15 oz of can Squash.
  3. {Take of Sprinkle of Pumpkin Spice optional.

Steps to make Simple Squashbread:

  1. In a large mixing bowl, mix then knead into a bread dough. Dough should not be sticky. Add more flour if sticky..
  2. Form ball, cover bowl, rest it about 30 mins..
  3. Score like scones 12 equal pieces..
  4. Roll each piece into ball placing in Teflon muffin pan..
  5. Bake 350° for 20 mins (clean toothpick test). I brushed butter on top last five minutes and is not necessary..
  6. Let cool and loosened with plastic knife..
  7. Slice and serve with butter. I used Butternut Squash in the recipe which has some sweetness..
  8. I store extras in a plastic bag in the refrigerator..

So that is going to wrap this up for this exceptional food simple squashbread recipe. Thanks so much for reading. I'm confident you will make this at home. There's gonna be interesting food at home recipes coming up. Remember to bookmark this page in your browser, and share it to your loved ones, colleague and friends. Thank you for reading. Go on get cooking!

How to Make Homemade Beautifuldesign's Easy Fried Green Tomatoes

How to Make Homemade Beautifuldesign's Easy Fried Green Tomatoes

Beautifuldesign's Easy Fried Green Tomatoes.

Beautifuldesign's Easy Fried Green Tomatoes

Hello everybody, it's Louise, welcome to my recipe page. Today, I will show you a way to prepare a distinctive dish, beautifuldesign's easy fried green tomatoes. It is one of my favorites. For mine, I am going to make it a little bit tasty. This will be really delicious.

Beautifuldesign's Easy Fried Green Tomatoes is one of the most favored of recent trending meals on earth. It is easy, it's quick, it tastes delicious. It is appreciated by millions daily. Beautifuldesign's Easy Fried Green Tomatoes is something that I've loved my entire life. They are nice and they look wonderful.

To get started with this particular recipe, we have to prepare a few ingredients. You can have beautifuldesign's easy fried green tomatoes using 3 ingredients and 5 steps. Here is how you can achieve that.

The ingredients needed to make Beautifuldesign's Easy Fried Green Tomatoes:

  1. {Take of Firm, rinsed green tomatoes.
  2. {Take of Andy's vegetable seasoning.
  3. {Get of Cooking oil of your choice.

Steps to make Beautifuldesign's Easy Fried Green Tomatoes:

  1. Slice tomatoes to your desired thickness..
  2. Preheat cooking oil to 375 degrees in skillet or deep fryer. In a skillet, use enough oil to cover the bottom & then some..
  3. Pour vegetable seasoning in a bowl & coat tomatoes with seasoning and let sit for a few minutes then place in fryer. Let cook to your desired doneness. For skillet use, if you use less oil then turn the tomatoes over for even cooking..
  4. Remove from skillet or fryer & drain any excess oil.
  5. Let cool for a moment & serve with your choice of sauce. I use Ranch dressing or Remoulade sauce. Enjoy!.

So that is going to wrap it up for this special food beautifuldesign's easy fried green tomatoes recipe. Thanks so much for reading. I'm confident that you can make this at home. There is gonna be more interesting food at home recipes coming up. Don't forget to save this page on your browser, and share it to your family, colleague and friends. Thank you for reading. Go on get cooking!

Step-by-Step Guide to Prepare Perfect Sesame & Poppy Kaiser Rolls
(Kaisersemmel) with Skim Milk

Step-by-Step Guide to Prepare Perfect Sesame & Poppy Kaiser Rolls (Kaisersemmel) with Skim Milk

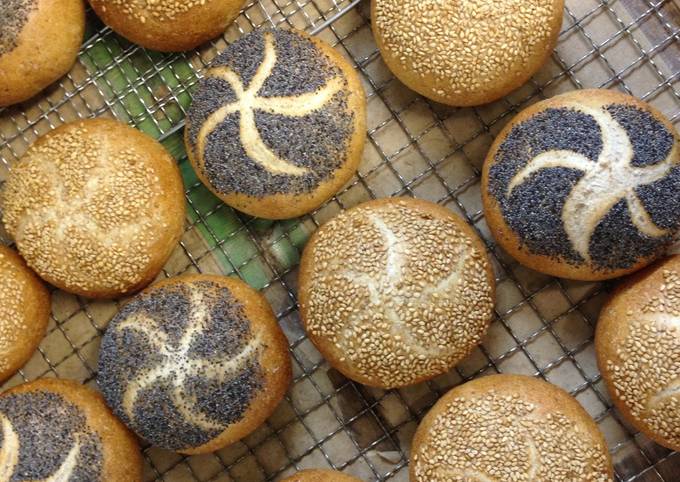
Sesame & Poppy Kaiser Rolls (Kaisersemmel) with Skim Milk. Sesame (/ˈsɛzəmiː/ or /ˈsɛsəmiː/; Sesamum indicum) is a flowering plant in the genus Sesamum, also called benne. Numerous wild relatives occur in Africa and a smaller number in India. From Middle English sysame, sisamie, from Latin sīsamī, genitive singular of Latin sīsamum, sēsamum (compare Medieval Latin sīsaminum, Old French sisamin), from Ancient Greek σήσαμον (sḗsamon, "sesame seed") and σησάμη (sēsámē, "sesame plant"), from Old Aramaic שושמא‎ (šūššmā).

Sesame & Poppy Kaiser Rolls (Kaisersemmel) with Skim Milk Sesame, erect annual plant of the family Pedaliaceae, cultivated since antiquity for its seeds, which are used as food Learn more about the nutritional properties, history, and uses of sesame in this article. Sesame definition is - a widely cultivated chiefly tropical or subtropical annual erect herb (Sesamum indicum of the family Pedaliaceae); also : its small seeds used especially as a source of oil and a. Sesame seeds, popularly known as 'Til' in Hindi, 'Nuvvulu' in Telugu, 'Ellu' (Tamil, Malayalam, Kannada), 'Teel' in Marathi and 'Til' in Bengali are the oldest condiment known to mankind.

Hey everyone, hope you are having an amazing day today. Today, I'm gonna show you how to prepare a distinctive dish, sesame & poppy kaiser rolls (kaisersemmel) with skim milk. One of my favorites. This time, I will make it a bit tasty. This is gonna smell and look delicious.

Sesame & Poppy Kaiser Rolls (Kaisersemmel) with Skim Milk is one of the most popular of current trending foods in the world. It is easy, it's fast, it tastes delicious. It's appreciated by millions every day. Sesame & Poppy Kaiser Rolls (Kaisersemmel) with Skim Milk is something which I have loved my whole life. They are fine and they look wonderful.

Sesame (/ˈsɛzəmiː/ or /ˈsɛsəmiː/; Sesamum indicum) is a flowering plant in the genus Sesamum, also called benne. Numerous wild relatives occur in Africa and a smaller number in India. From Middle English sysame, sisamie, from Latin sīsamī, genitive singular of Latin sīsamum, sēsamum (compare Medieval Latin sīsaminum, Old French sisamin), from Ancient Greek σήσαμον (sḗsamon, "sesame seed") and σησάμη (sēsámē, "sesame plant"), from Old Aramaic שושמא‎ (šūššmā).

To begin with this particular recipe, we have to first prepare a few ingredients. You can have sesame & poppy kaiser rolls (kaisersemmel) with skim milk using 11 ingredients and 15 steps. Here is how you can achieve it.

The ingredients needed to make Sesame & Poppy Kaiser Rolls (Kaisersemmel) with Skim Milk:

  1. {Prepare of Day 1 - "Pre-dough":.
  2. {Make ready 50 g of rye flour.
  3. {Take 50 g of whole wheat.
  4. {Prepare 1/4 tsp of instant yeast (0.5 g, actually little less than 1/4 tsp) = 1.5 g fresh yeast.
  5. {Make ready 125 g of water.
  6. {Prepare of Day 2 - Main dough:.
  7. {Prepare 400 g of all-purpose or bread flour.
  8. {Get 190 g of skim milk.
  9. {Make ready 2 g of instant yeast or 6 g fresh yeast.
  10. {Get 11 g of salt.
  11. {Prepare of Sesame seeds and poppy seeds for topping.

SESAME — Sésame (homonymie) Cette page d'homonymie répertorie les différents sujets et sesame — ► NOUN ▪ a tall herbaceous plant of tropical and subtropical areas, cultivated for its oil. Sesame seeds add a nutty taste and a delicate, almost invisible, crunch to many Asian dishes. They are also the main ingredients in tahini (sesame seed paste) and the wonderful Middle Eastern sweet. Sesame seeds are rich in fiber, an important dietary component that helps bulk up stools and promote regular elimination.

Steps to make Sesame & Poppy Kaiser Rolls (Kaisersemmel) with Skim Milk:

  1. Mix the pre dough ingredients in a bowl. Cover with plastic wrap and let ferment in the refrigerator for 24-48 hours.
  2. On day 2 - baking day: mix the yeast with skim milk..
  3. In a large bowl add the flour, the pre-dough and then pour the skim milk mix around the edge..
  4. Working from around the edge of the bowl, gradually work the liquid and flour together until the liquid has been absorbed. The dough will be moist yet still in chunky crumbles..
  5. Next work the center of the dough by squeezing with your hands - bring it together into a ball until no longer crumbly and all the flour has been worked in..
  6. Remove dough to a floured working surface and knead into a smooth ball..
  7. Cover and let rise in a warm place for 40-60 minutes until doubled in size.
  8. Divide dough into 8 pieces (100 g each) and roll into small balls. Set on a cloth and gently cover with a tea towel or put into a wooden proofing box. Let rest for 20 minutes.
  9. Next press out the air from each ball of dough and reform into a roll by folding over the edges in a circular pattern and pressing the folded edges into the center..
  10. Moisten the smooth side of each roll on a moist towel and dip into either seas,e or poppy seeds. Place seed-side down on a bakery/canvas cloth and let rise for another 30 minutes.
  11. After risen, place each roll gently onto a baking sheet with the seed side up. If you have one, each roll with a Kaiser roll pattern stamp. If not make one or two cuts in the surface.
  12. Alight rolls seed side up on the baking sheet. Leave some space in between..
  13. Bake at 250°C/480°F for 15 minutes with steam..
  14. Let cool on a rack.
  15. Mmm Brötchen sandwiches....

Sesame oil is a liquid derived from sesame seeds through various manufacturing. Sesame seeds are one of the oldest and indispensable condiments ever known to mankind. They are versatile, fragrant, and are nutty variants. The seeds add a crunch to a variety of Asian and Middle. An erect annual plant native to tropical Asia.

So that is going to wrap it up with this special food sesame & poppy kaiser rolls (kaisersemmel) with skim milk recipe. Thanks so much for reading. I'm confident that you will make this at home. There's gonna be more interesting food in home recipes coming up. Don't forget to save this page in your browser, and share it to your loved ones, friends and colleague. Thanks again for reading. Go on get cooking!

Recipe of Perfect Carbonara Fettuccine

Recipe of Perfect Carbonara Fettuccine

Carbonara Fettuccine.

Carbonara Fettuccine

Hey everyone, hope you are having an incredible day today. Today, we're going to prepare a distinctive dish, carbonara fettuccine. One of my favorites food recipes. For mine, I'm gonna make it a bit tasty. This is gonna smell and look delicious.

Carbonara Fettuccine is one of the most popular of recent trending foods on earth. It's simple, it's quick, it tastes yummy. It's appreciated by millions every day. Carbonara Fettuccine is something which I've loved my entire life. They are nice and they look wonderful.

To get started with this recipe, we have to first prepare a few components. You can have carbonara fettuccine using 7 ingredients and 5 steps. Here is how you can achieve it.

The ingredients needed to make Carbonara Fettuccine:

  1. {Get 1/2 can of cream of chicken.
  2. {Make ready of 1/2 can water.
  3. {Take of 100 gram fettuccine.
  4. {Make ready of 3 small egg yolk.
  5. {Make ready of 1/4 cup grated parmesan.
  6. {Make ready of 1 tsp Of xo Scallop.
  7. {Make ready Dash of Chili flake.

Instructions to make Carbonara Fettuccine:

  1. Mix the egg yolk with grated parmesan cheese and set aside..
  2. Cook the fettuccine for 12 to 14 minutes then drain and set aside, reserve 1 cup of its pasta water.
  3. Bring to a simmer the cream of chicken with some water, mix well and off heat, add in the egg and cheese mixture and mix well.
  4. Add in the cooked fettuccine and mix well and serve.
  5. Fettuccine Top Chili Flake And XO Scallop Sauce And Enjoy.

So that's going to wrap it up for this exceptional food carbonara fettuccine recipe. Thank you very much for your time. I am sure that you will make this at home. There is gonna be more interesting food at home recipes coming up. Remember to save this page in your browser, and share it to your family, friends and colleague. Thanks again for reading. Go on get cooking!

Steps to Make Favorite Pumpkin soup

Steps to Make Favorite Pumpkin soup

Pumpkin soup. This is an excellent recipe for pumpkin soup! I have been using it for about two years and my whole family loves it! Whip up this easy pumpkin soup as a starter for a dinner party or a light supper when you need a bit of For an extra-velvety consistency you can pour the soup through a fine sieve.

Pumpkin soup Pumpkin soup is a usually 'bound' (thick) soup made from a purée of pumpkin. It is made by combining the meat of a blended pumpkin with broth or stock. It can be served hot or cold, and is a popular Thanksgiving dish in the United States.

Hey everyone, it is Brad, welcome to my recipe page. Today, I'm gonna show you how to make a special dish, pumpkin soup. One of my favorites food recipes. For mine, I will make it a little bit unique. This is gonna smell and look delicious.

This is an excellent recipe for pumpkin soup! I have been using it for about two years and my whole family loves it! Whip up this easy pumpkin soup as a starter for a dinner party or a light supper when you need a bit of For an extra-velvety consistency you can pour the soup through a fine sieve.

Pumpkin soup is one of the most favored of recent trending meals on earth. It's easy, it is quick, it tastes delicious. It is appreciated by millions every day. They're nice and they look fantastic. Pumpkin soup is something which I've loved my whole life.

To begin with this recipe, we have to first prepare a few ingredients. You can have pumpkin soup using 10 ingredients and 9 steps. Here is how you can achieve it.

The ingredients needed to make Pumpkin soup:

  1. {Take of Oil.
  2. {Take of Large onion.
  3. {Get of Diced pumpkin. Don't peel it off.
  4. {Prepare 1 of tomato. You don't want a sour soup so one is enough.
  5. {Prepare of Carrots. Slice them.
  6. {Make ready of Minji. Ukipenda weka Ata spinach.
  7. {Get of Salt.
  8. {Make ready of Black pepper ama fresh pilipili ya kawaida to your liking.
  9. {Prepare of Rosemary, garlic, ginger or any spice you're comfortable with.
  10. {Take of I used the 3 spices as above.

Looking for the best Pumpkin Soup recipes? Get recipes like Spicy Pumpkin Soup, Curried Squash and Pear Soup and Curried Butternut Squash Soup from Simply Recipes. These pumpkin soup recipes are like the ultimate experience of fall. They're packed with seasonal flavor, are easy to make, and will fill your house with happiness and warmth.

Steps to make Pumpkin soup:

  1. Heat your oil and add the onion..
  2. Tender the onion. Don't overcook it.
  3. Add all the other ingredients together and stir. Use low heat.
  4. Cover your pot for few till the ingredients mix well. Still keep low heat.
  5. Add some water to slightly cover the contents in the pot and cover..
  6. Cook under low heat till the pumpkin is well cooked. Utaona tu ikijivunja yenyewe.
  7. Once cooked, remove from the heat and let it cool off kiasi..
  8. Once they have cooled off weka kwa blender and blend thoroughly..
  9. There you go! Bon a petit!.

Watch how to make the best pumpkin soup in this short recipe video! This creamy (yet cream-less) soup features incredible roasted pumpkin flavor..pumpkin soup with detailed photo and video recipe. perhaps one of the healthy, easy and most popular soup recipes prepared within minutes with roasted pumpkins. it is basically prepared with. Pumpkin soup in the fall is something that never gets old. It's healthy, super creamy, and keeps you You can use various winter squashes to make this soup but our top two favorite types are sugar. Pumpkin soup is what we all crave come October, but the idea of starting with an actual pumpkin?

So that's going to wrap this up with this special food pumpkin soup recipe. Thank you very much for your time. I am sure that you can make this at home. There's gonna be interesting food in home recipes coming up. Remember to save this page on your browser, and share it to your loved ones, colleague and friends. Thanks again for reading. Go on get cooking!

How to Prepare Super Quick Homemade Christmas Chuck Roast🍠🍠😜😜

How to Prepare Super Quick Homemade Christmas Chuck Roast🍠🍠😜😜

Christmas Chuck Roast🍠🍠😜😜.

Christmas Chuck Roast🍠🍠😜😜

Hello everybody, hope you're having an incredible day today. Today, I'm gonna show you how to prepare a special dish, christmas chuck roast🍠🍠😜😜. One of my favorites. For mine, I will make it a bit unique. This will be really delicious.

Christmas Chuck Roast🍠🍠😜😜 is one of the most well liked of current trending foods on earth. It is enjoyed by millions every day. It is easy, it's fast, it tastes yummy. Christmas Chuck Roast🍠🍠😜😜 is something that I've loved my whole life. They are fine and they look wonderful.

To get started with this particular recipe, we must first prepare a few components. You can cook christmas chuck roast🍠🍠😜😜 using 5 ingredients and 6 steps. Here is how you can achieve that.

The ingredients needed to make Christmas Chuck Roast🍠🍠😜😜:

  1. {Take 1 (4 lb) of chuck roast.
  2. {Get 1 of 3rd of a cup of flour.
  3. {Make ready 1 of quarter of an onion.
  4. {Take 2 spoons of garlic.
  5. {Prepare 2 tbsp of olive oil.

Instructions to make Christmas Chuck Roast🍠🍠😜😜:

  1. Spread the flour on the chuck roast. Seer with olive oil..
  2. Cut little slices in the chuck roast. Stuff them with onions and garlic..
  3. Put in oven for 4hr at 275°..
  4. ENJOY!!!😜😜😋😋🍠🍠.
  5. Check out my other Christmas recipes!🎄🎄🎄.
  6. Other recipe (see recipe).

So that's going to wrap it up with this special food christmas chuck roast🍠🍠😜😜 recipe. Thanks so much for your time. I'm sure that you can make this at home. There's gonna be more interesting food at home recipes coming up. Don't forget to save this page on your browser, and share it to your family, friends and colleague. Thanks again for reading. Go on get cooking!

Steps to Prepare Super Quick Homemade Easy and Scrumptious Lasagna with
Homemade Noodles

Steps to Prepare Super Quick Homemade Easy and Scrumptious Lasagna with Homemade Noodles

Easy and Scrumptious Lasagna with Homemade Noodles.

Easy and Scrumptious Lasagna with Homemade Noodles

Hey everyone, hope you are having an amazing day today. Today, I'm gonna show you how to make a distinctive dish, easy and scrumptious lasagna with homemade noodles. One of my favorites food recipes. This time, I will make it a bit tasty. This will be really delicious.

Easy and Scrumptious Lasagna with Homemade Noodles is one of the most well liked of current trending meals in the world. It's simple, it's fast, it tastes delicious. It is appreciated by millions every day. Easy and Scrumptious Lasagna with Homemade Noodles is something that I have loved my whole life. They're nice and they look wonderful.

To get started with this recipe, we must first prepare a few components. You can have easy and scrumptious lasagna with homemade noodles using 28 ingredients and 51 steps. Here is how you cook that.

The ingredients needed to make Easy and Scrumptious Lasagna with Homemade Noodles:

  1. {Get of For the lasagna dough.
  2. {Get of Semolina flour (or bread flour).
  3. {Get of Olive oil (or vegetable oil).
  4. {Take of Salt.
  5. {Make ready of Eggs.
  6. {Take of For the easy meat sauce.
  7. {Get of Ground meat (your choice of meat).
  8. {Get of Onion.
  9. {Make ready of Carrot.
  10. {Make ready of Garlic (tubed garlic is also fine).
  11. {Prepare of Olive oil (or vegetable oil).
  12. {Prepare of Consommé soup stock granules.
  13. {Prepare of Soy sauce.
  14. {Get of Sake.
  15. {Make ready of Japanese Worcestershire sauce (or your choice of choice, such as tonkatsu sauce).
  16. {Prepare of Ketchup.
  17. {Make ready of Canned diced tomatoes.
  18. {Prepare of Water.
  19. {Get of Krazy Salt (or salt and pepper).
  20. {Make ready of For the bechamel sauce.
  21. {Prepare of Milk.
  22. {Take of Butter or margarine.
  23. {Take of Plain white flour.
  24. {Make ready of Consommé soup stock granules.
  25. {Get of Salt and pepper.
  26. {Take of Toppings.
  27. {Make ready of Cheese (pizza cheese) easy melting type.
  28. {Prepare of Dried parsley or your choice of herbs.

Instructions to make Easy and Scrumptious Lasagna with Homemade Noodles:

  1. Prepare the dough first. Put the semolina (or bread) flour into a bowl, and make a well in the middle..
  2. In a separate bowl, combine the eggs, olive oil (or vegetable oil), and salt well. Pour this mixture into the well in the flour..
  3. Gradually incorporate the flour while mixing in the egg mixture..
  4. When the dough is more or less combined, knead it into a ball with your hands. Even if it is flaky and rough, it's fine as long as it is collected into a single mass..
  5. Bring the dough together and flatten it a bit. Wrap the dough in plastic wrap or put it into a plastic bag. Seal the bag or wrap well, and rest the dough in the refrigerator for 2 hours..
  6. While the dough is resting, prepare the bechamel sauce and meat sauce. Let's start with the easy meat sauce.....
  7. Finely mince the garlic and carrot, then chop the onion a bit more roughly..
  8. Sauté the chopped garlic with olive oil (or vegetable oil) in a frying pan until fragrant..
  9. Add the ground meat to the frying pan and sauté it until browned. Add the carrot and onion and sauté well. Do this over high heat, taking care not to let it burn..
  10. When the moisture has cooked out, add the sake, soy sauce, and soup stock and continue sautéing. Stir in the can of diced tomatoes..
  11. When tomatoes are well incorporated, add enough water to cover all of the ingredients, plus the Japanese-style Worcestershire sauce and ketchup. Stir well, and continue cooking over high heat to reduce the sauce rapidly..
  12. Continue stirring while occasionally crushing the tomatoes with a ladle or a wooden spatula..
  13. When the sauce has reduced so that there's little liquid left in the pan, taste, and add the salt and pepper or Krazy Salt to taste! Adjust the seasoning to taste and it's done! This is a simple and easy meat sauce..
  14. Now, let's make the bechamel sauce. Put the butter or margarine in a frying pan or a pot, and melt it over low heat. Add the consommé soup stock granules..
  15. Stir to dissolve the consommé soup stock granules in the butter or margarine..
  16. When that's done, add 2 tablespoons out of the 5 tablespoons of flour. Stir it into the butter or margine until it has melted in completely..
  17. Next, add 2 more tablespoons of flour and mix it in evenly. Add the final tablespoon of flour and mix it in completely..
  18. When the roux is blended, add the milk in several batches, stirring until smooth between additions. Continue adding until all of the milk is incorporated..
  19. Continue to mix away! When the sauce is smooth and creamy, it's done! If you still have some undissolved lumps, add a little more milk..
  20. Taste, and season with salt and pepper. The easy bechamel sauce is done. It should ideally be rather thick..
  21. Don't make the meat sauce or the bechamel sauce too salty. The lasagna will be topped with lots of cheese, so it will taste fine in the end..
  22. After the dough has rested for 2 hours, take it out of the refrigerator, put it on a sheet of parchment paper, and divide it into 2 portions..
  23. Return one half to the plastic wrap or bag. Knead the other half a little to relax it. It will be quite pretty stiff, so press down hard!.
  24. Knead the dough until smooth (on the surface), then press it out with your palms to flatten it a bit..
  25. The dough will be stiff, so you need a lot of strength...Press and roll hard with a rolling pin. Roll it out to a 1 mm thickness..
  26. Don't worry about the shape of the dough too much; just continue rolling it out until it's 1 mm thick. When the dough is rolled out, cut it so it's a little smaller than the casserole or lasagna pan you're using..
  27. You don't have to make it too exact! Just cut it approximately without worrying about fitting it perfectly. The cut off end pieces will be used later..
  28. Roll out the other half of the dough in the same way. Once the dough is rolled out, boil it. Bring water to a boil in a large frying pan or pot, and add about 1 tablespoon of oil..
  29. Mix the water and oil, then add the dough and boil it. The dough will float to the surface; the boiling time depends on the thickness and size of the dough sheets....
  30. For a thin and translucent noodle that floats to the surface, it should boil for about 3 minutes or so. If it's 1 mm thick, cook for about 4 minutes, and it's 2 mm thick or so, cook for 5 to 6 minutes..
  31. Ideally, for the most authentic results, the dough should fit the baking dish exactly! But that's a bit hard to achieve, so you can cut it in half to fit..
  32. Boil the cut off end pieces of the noodles, too. These will be used like puzzle pieces in the lasagna..
  33. The boiling times for the noodles are for reference only. To be sure, cut off a bit of the thickest part and test the cut piece for doneness!.
  34. If the noodles are still floury and uncooked in the middle, they are done. Once the noddles are cooked, rinse them briefly in cold water and drain in a colander..
  35. Once you have the meat sauce, bechamel sauce, and lasagna noddles ready, preheat the oven to 250 °C!.
  36. Grease the inside of the dish you'll be using to bake the lasagna with a little butter or margarine (not listed in the ingredient list). Start with a layer of bechamel sauce, followed by a layer of meat sauce..
  37. Add a bit more meat sauce than bechamel sauce! If you are using a dish of about the size specified here, you should be able to make about 4 layers total..
  38. It might be best to divide the sauce into 4 portions beforehand. Add a layer of noodles after the meat sauce layer! Repeat the layers..
  39. Even if the lasagna noodles are in pieces, you can fit them together like a puzzle without any gaps as shown..
  40. Since the lasagna noodles become thicker when they're cooked; if you roll them out 1 mm thick as a base, even if the sheets are not perfectly rectangular they can still be used. Since this is an easy casual lasagna, don't worry about making it perfectly..
  41. Keep layering in the ingredients, from the bechamel sauce to the meat sauce. Top with the pizza cheese. Melting-type sliced cheese may also work..
  42. Add as much cheese as you like..
  43. When I added the last layer of meat sauce, my casserole was filled to the brim! If you add a bit less, leaving space at the top of your casserole dish, the cheese won't bubble over when it's baked..
  44. Bake in an oven preheated to 250 °C for around 15 minutes, keeping an eye on it until the surface is crispy and browned..
  45. When it has browned evenly on the surface, it's done. Sprinkle with dried parsley to taste..
  46. Here is a view from the side....
  47. The cut side is also well defined..
  48. If you want to make more dough, use 1 egg per 100 g of flour, 1/4 teaspoon of salt and 1 teaspoon of oil..
  49. The first time you make this, you might get slightly confused about some of the steps...so try it out when you have some time to spare. It's surprisingly easy to make..
  50. If your noodle sheets do not have an even thickness and the thicker parts float up to the surface as you're cooking them, open a few holes in the dough with chopsticks, and it will cook faster..
  51. The dough is so firm and chewy that you shouldn't need any flour for dusting, but if it looks like it will stick as you work it, use a little flour..

So that is going to wrap it up with this special food easy and scrumptious lasagna with homemade noodles recipe. Thank you very much for reading. I am confident you can make this at home. There is gonna be interesting food at home recipes coming up. Remember to save this page in your browser, and share it to your family, colleague and friends. Thanks again for reading. Go on get cooking!

Easiest Way to Make Favorite Chilli chicken

Easiest Way to Make Favorite Chilli chicken

Chilli chicken. Chilli chicken is a popular Indo-Chinese dish of chicken of Hakka Chinese heritage. In India, this may include a variety of dry chicken preparations. Chilli chicken is one of the most popular Indo-Chinese style chicken appetizer or starter that is served in Indo-Chinese restaurants.

Chilli chicken How To Make The Best Chicken Stir Fry Simple Chilli Chicken. featured in Red Sauce Recipes. Remove the chicken and peppers and set aside.

Hello everybody, hope you are having an amazing day today. Today, I'm gonna show you how to make a distinctive dish, chilli chicken. One of my favorites. This time, I'm gonna make it a little bit unique. This is gonna smell and look delicious.

Chilli chicken is one of the most popular of current trending foods in the world. It's simple, it is quick, it tastes yummy. It's enjoyed by millions daily. They're fine and they look wonderful. Chilli chicken is something which I have loved my entire life.

Chilli chicken is a popular Indo-Chinese dish of chicken of Hakka Chinese heritage. In India, this may include a variety of dry chicken preparations. Chilli chicken is one of the most popular Indo-Chinese style chicken appetizer or starter that is served in Indo-Chinese restaurants.

To get started with this particular recipe, we must prepare a few ingredients. You can have chilli chicken using 10 ingredients and 6 steps. Here is how you can achieve that.

The ingredients needed to make Chilli chicken:

  1. {Get 2 of chicken breasts (cut in strips).
  2. {Take 1/2 teaspoon of pepper.
  3. {Make ready 1 tsp of salt.
  4. {Prepare 1 of egg beaten.
  5. {Take 3/4 cup of flour.
  6. {Prepare 1 of red chilli chopped.
  7. {Prepare 3 tablespoons of soy sauce.
  8. {Make ready 2 tablespoons of tomato sauce.
  9. {Get 2 tablespoons of chilli sauce.
  10. {Make ready 1/2 cup of water (100 mL).

In the same pan, add the garlic, red chilli, soy sauce, tomato purée, and water. Was chilli chicken the first thing that you used to order in a restaurant during your school/college days? During my school years, fried rice & chilli chicken was the most happening couple. You will find this popular dry chilli chicken dish in both Hakka Chinese restaurants and Indian restaurants, so does this make it a Hakka dish or an Indian Chinese dish?

Steps to make Chilli chicken:

  1. Season chicken with salt & pepper..
  2. Coat in egg wash and flour. Deep fry the chicken. (or shallow fry if you like). Set aside..
  3. Stir fry the vegetables. Set aside..
  4. In a pan, add bit of oil, add the garlic, red chilli, soy sauce, tomato purée, and water..
  5. Stir and simmer the mixture reduces and is thick and syrupy..
  6. Add back in the vegetables & chicken. Stir well in the sauce..

Chicken, cannellini beans, and salsa verde make this a delicious and somewhat spicy dish. Now make Chinese Chilli Chicken easily at home with this recipe that'll give you the real deal restaurant style taste! A super simple recipe with juicy chicken. Chilli Chicken Recipe, Learn how to make Chilli Chicken (absolutely delicious recipe of Chilli This Chilli Chicken recipe is Excellent and find more Great recipes, tried & tested recipes from NDTV Food. Chilli chicken is a popular dish in Indo-Chinese cuisine.

So that is going to wrap it up for this special food chilli chicken recipe. Thanks so much for reading. I am confident you can make this at home. There's gonna be more interesting food in home recipes coming up. Don't forget to bookmark this page in your browser, and share it to your family, colleague and friends. Thank you for reading. Go on get cooking!

Easiest Way to Make Perfect White Chocolate Cupcake with Peanut Butter
frosting

Easiest Way to Make Perfect White Chocolate Cupcake with Peanut Butter frosting

White Chocolate Cupcake with Peanut Butter frosting.

White Chocolate Cupcake with Peanut Butter frosting

Hey everyone, I hope you're having an amazing day today. Today, I will show you a way to make a distinctive dish, white chocolate cupcake with peanut butter frosting. One of my favorites food recipes. For mine, I'm gonna make it a little bit tasty. This will be really delicious.

White Chocolate Cupcake with Peanut Butter frosting is one of the most favored of current trending meals on earth. It is simple, it's quick, it tastes delicious. It's enjoyed by millions daily. They are nice and they look fantastic. White Chocolate Cupcake with Peanut Butter frosting is something that I've loved my whole life.

To get started with this recipe, we must prepare a few components. You can cook white chocolate cupcake with peanut butter frosting using 13 ingredients and 5 steps. Here is how you cook it.

The ingredients needed to make White Chocolate Cupcake with Peanut Butter frosting:

  1. {Make ready of Cupcake.
  2. {Prepare 5 of egg whites (room temperature).
  3. {Get 3/4 cup of whole milk (divided).
  4. {Take 3/4 cup of unsalted butter, softened.
  5. {Make ready 1 3/4 cup of granulated sugar.
  6. {Take 3 1/2 oz of melted white chocolate.
  7. {Take 2 1/2 cup of cake flour.
  8. {Prepare 1 tbsp of baking powder.
  9. {Make ready of Peanut Butter Frosting.
  10. {Prepare 1 cup of unsalted butter softened.
  11. {Get 2 cup of powdered sugar.
  12. {Get 1/3 cup of creamy peanut butter.
  13. {Take 1 1/2 tbsp of whole milk.

Instructions to make White Chocolate Cupcake with Peanut Butter frosting:

  1. For the cake, whisk together the egg whites, and 1/4 cup of the milk in small bowl until slightly combined. Set aside..
  2. In mixing bowl, beat butter and sugar for 2 minutes on medium. Add in dry ingredients and mix until combined. Slowly in a steady stream add in the egg white mixture. Beat in remaining milk and melted white chocolate..
  3. Fill cupcake liners half full with batter and bake in a 350°F oven for about 15 minutes. Remove and cool in pan 5 minutes then transfer to a wire rack. Cool completely before frosting..
  4. For frosting, beat butter 5 minutes until pale in color. Add sugar, peanut butter and whole milk. Beat an additional 3-5 minutes until fluffy. Fill a disposable pastry bag with frosting (no tip on end)..
  5. .

So that is going to wrap it up for this special food white chocolate cupcake with peanut butter frosting recipe. Thank you very much for your time. I am sure you will make this at home. There's gonna be interesting food at home recipes coming up. Don't forget to bookmark this page on your browser, and share it to your loved ones, colleague and friends. Thanks again for reading. Go on get cooking!

Recipe of Ultimate Gratin

Recipe of Ultimate Gratin

Gratin. Gratin (French pronunciation: [ɡʁatɛ̃]) is a culinary technique in which an ingredient is topped with a browned crust, often using breadcrumbs, grated cheese, egg or butter. Gratin is usually prepared in a shallow dish of some kind. Avocado gratin Gratin (pronounced: [gʁa.tɛ̃]) is a widespread culinary technique in food preparation in which an ingredient is topped with a browned crust, often using breadcrumbs, grated cheese.

Gratin Sharp cheddar cheese tastes great in this. This Potato Gratin is the perfect simple side dish for any type of meal, whether its I mentioned how I decided to skip mashed potatoes altogether and make potato gratin instead, and how much more I. Just about everything tastes good in a gratin.

Hello everybody, it is Jim, welcome to our recipe page. Today, I'm gonna show you how to make a special dish, gratin. One of my favorites food recipes. This time, I'm gonna make it a little bit tasty. This will be really delicious.

Gratin is one of the most popular of recent trending meals on earth. It's easy, it's quick, it tastes yummy. It is appreciated by millions every day. They are fine and they look wonderful. Gratin is something which I've loved my whole life.

Gratin (French pronunciation: [ɡʁatɛ̃]) is a culinary technique in which an ingredient is topped with a browned crust, often using breadcrumbs, grated cheese, egg or butter. Gratin is usually prepared in a shallow dish of some kind. Avocado gratin Gratin (pronounced: [gʁa.tɛ̃]) is a widespread culinary technique in food preparation in which an ingredient is topped with a browned crust, often using breadcrumbs, grated cheese.

To begin with this recipe, we have to first prepare a few components. You can cook gratin using 10 ingredients and 2 steps. Here is how you can achieve that.

The ingredients needed to make Gratin:

  1. {Get of milk.
  2. {Get of flour.
  3. {Make ready of salt,.
  4. {Take of oregano.
  5. {Prepare of shredded cheddar.
  6. {Make ready of butter.
  7. {Take of cauliflower boiled.
  8. {Prepare of carrots.
  9. {Prepare of green beans, boiled.
  10. {Get of Cheese.

Try our gratin recipes using everything from cod to courgettes, Brussels sprouts to broccoli. Mary Berry's fennel gratin uses nothing but butter and. Gratin — de pâtes au fromage Un gratin est une préparation qui est cuite au four ou dont une partie de la cuisson se passe au four, en utilisant plus particulièrement le grill, ou à la salamandre, de telle sorte. Potatoes au Gratin is the ultimate potato recipe!

Steps to make Gratin:

  1. In a large saucepan, Add butter and flour and cook over medium high heat, stirring occasionally until tender now add salt and oregano. Cook and stir one minute. Add milk,.Cook and whisk until thickened and bubbly all over.Stir in shredded cheddar until melted. Add hot, drained vegetables to saucepan, stirringto coat evenly with the sauce.Pour vegetables and sauce into deep one quart casserole dish..
  2. Spread shredded cheese and.Bake uncovered in 350 F oven for 25 - 30 minutes, until heated through are golden brown......

Au gratin potatoes are one of the greatest casseroles of all time. Tender, fluffy potatoes are bathed in a If you thought au gratin potatoes required some special technique or hours over the stove, let me. Of all the ways to make potatoes, au gratin may be our favorite. Maybe it's the gruyere, or the Parm, or the fact that they just turn out so gooey and cheesy, but they really are the ultimate fancy-ish comfort. Gratin is a culinary technique in which an ingredient is topped with a browned crust, often using A gratin is baked or cooked under an overhead grill or broiler to form a golden crust on top and is often.

So that's going to wrap it up for this special food gratin recipe. Thanks so much for your time. I'm sure you will make this at home. There's gonna be more interesting food in home recipes coming up. Don't forget to bookmark this page on your browser, and share it to your family, friends and colleague. Thanks again for reading. Go on get cooking!

Recipe of Award-winning Moroccan chicken and pumpkin with quinoa

Recipe of Award-winning Moroccan chicken and pumpkin with quinoa

Moroccan chicken and pumpkin with quinoa.

Moroccan chicken and pumpkin with quinoa

Hey everyone, it is John, welcome to my recipe page. Today, I'm gonna show you how to prepare a distinctive dish, moroccan chicken and pumpkin with quinoa. One of my favorites food recipes. This time, I'm gonna make it a little bit tasty. This will be really delicious.

Moroccan chicken and pumpkin with quinoa is one of the most well liked of recent trending foods in the world. It is easy, it is quick, it tastes yummy. It is appreciated by millions daily. They are nice and they look fantastic. Moroccan chicken and pumpkin with quinoa is something that I have loved my whole life.

To begin with this recipe, we must first prepare a few components. You can have moroccan chicken and pumpkin with quinoa using 13 ingredients and 7 steps. Here is how you can achieve it.

The ingredients needed to make Moroccan chicken and pumpkin with quinoa:

  1. {Get 6 of chicken thigh fillets.
  2. {Prepare 1 of small pumpkin.
  3. {Get 1 of onion.
  4. {Get 1 of yellow pepper.
  5. {Make ready 1 of red chilli.
  6. {Prepare 2 of garlic cloves.
  7. {Prepare 1 packet of cherry tomatoes.
  8. {Prepare 1 jar of green olives.
  9. {Prepare of Fresh thyme.
  10. {Take 2 tsp of harissa paste.
  11. {Prepare 2 tsp of ras el hanout.
  12. {Get 150 g of quinoa.
  13. {Get 1 of chicken stock cube.

Steps to make Moroccan chicken and pumpkin with quinoa:

  1. Preheat the oven to 180c.
  2. Slice the pumpkin, onion, pepper, garlic and chilli. Place in a roasting pan with the tomatoes.
  3. Add the olives, thyme leaves, ras el hanout and harissa paste..
  4. Mix in the chicken to coat all the ingredients in the spices. Place in the oven for 20mins.
  5. Meanwhile boil the quinoa as per packet instructions and a stock cube. Add seasoning and thyme leaves in the last minute of cooking..
  6. Remove the roasting dish from the oven.
  7. Serve and enjoy 😊.

So that's going to wrap this up for this special food moroccan chicken and pumpkin with quinoa recipe. Thanks so much for your time. I am confident you will make this at home. There's gonna be more interesting food in home recipes coming up. Don't forget to save this page on your browser, and share it to your family, friends and colleague. Thank you for reading. Go on get cooking!

Easiest Way to Prepare Favorite #onerecipeonetree Simple Salad

Easiest Way to Prepare Favorite #onerecipeonetree Simple Salad

#onerecipeonetree Simple Salad.

#onerecipeonetree Simple Salad

Hey everyone, it is me, Dave, welcome to our recipe site. Today, I will show you a way to prepare a special dish, #onerecipeonetree simple salad. One of my favorites. For mine, I am going to make it a little bit tasty. This will be really delicious.

#onerecipeonetree Simple Salad is one of the most well liked of current trending meals in the world. It's enjoyed by millions every day. It's simple, it's fast, it tastes yummy. #onerecipeonetree Simple Salad is something which I've loved my entire life. They're nice and they look wonderful.

To get started with this particular recipe, we must first prepare a few ingredients. You can have #onerecipeonetree simple salad using 7 ingredients and 3 steps. Here is how you can achieve it.

The ingredients needed to make #onerecipeonetree Simple Salad:

  1. {Take of lettuce.
  2. {Make ready of Cucumber.
  3. {Take of hard boiled egg.
  4. {Take of big tomato.
  5. {Make ready of Heinz Salad Cream.
  6. {Take of Bama Mayonnaise.
  7. {Make ready of sugar.

Steps to make #onerecipeonetree Simple Salad:

  1. Cut d lettuce, wash strain and set aside. Wash and slice the cucumber and tomato, remove the egg from its shell and slice then set aside also..
  2. Put the lettuce in a plate, arrange the sliced cucumber, tomatoes and eggs on top of the lettuce..
  3. Mix the mayonnaise, salad cream and sugar together then drizzle on top. Voilla!!! your simple healthy salad is ready and can be use as an accompaniment for many dishes like fried rice, brown rice, rice en stew.

So that's going to wrap it up with this exceptional food #onerecipeonetree simple salad recipe. Thanks so much for your time. I am confident you will make this at home. There's gonna be more interesting food at home recipes coming up. Don't forget to save this page on your browser, and share it to your loved ones, colleague and friends. Thank you for reading. Go on get cooking!

Easiest Way to Prepare Favorite Lentil & whey curry (Perfect Cooker
recipe)

Easiest Way to Prepare Favorite Lentil & whey curry (Perfect Cooker recipe)

Lentil & whey curry (Perfect Cooker recipe).

Lentil & whey curry (Perfect Cooker recipe)

Hey everyone, I hope you're having an incredible day today. Today, I'm gonna show you how to make a distinctive dish, lentil & whey curry (perfect cooker recipe). One of my favorites food recipes. This time, I am going to make it a bit unique. This will be really delicious.

Lentil & whey curry (Perfect Cooker recipe) is one of the most popular of current trending foods on earth. It is enjoyed by millions every day. It's simple, it is fast, it tastes yummy. They're fine and they look wonderful. Lentil & whey curry (Perfect Cooker recipe) is something which I've loved my entire life.

To begin with this recipe, we have to prepare a few components. You can have lentil & whey curry (perfect cooker recipe) using 14 ingredients and 9 steps. Here is how you can achieve it.

The ingredients needed to make Lentil & whey curry (Perfect Cooker recipe):

  1. {Make ready of sprinkle of olive oil.
  2. {Take 1/4 cup of red lentils.
  3. {Make ready 1 clove of garlic, pressed or chopped into small pieces.
  4. {Prepare 1/2 of medium sized onion, sliced.
  5. {Make ready 1 tbsp of desiccated coconut.
  6. {Make ready 1/4 tsp of chili powder.
  7. {Take 1/2 tsp of ground cumin.
  8. {Take 1/2 tsp of ground coriander.
  9. {Prepare 1/4 tsp of turmeric.
  10. {Get 1/2 cup of whey (or stock/water).
  11. {Take 1 tsp of white wine vinegar (or apple cider vinegar).
  12. {Make ready 1/2 of medium carrot, sliced in fairly thick pieces.
  13. {Prepare 1/2 of red pepper, sliced.
  14. {Prepare to taste of salt and pepper.

Instructions to make Lentil & whey curry (Perfect Cooker recipe):

  1. Coat the Perfect Cooker cup with a sprinkle of olive oil.
  2. Put the lentils in the Perfect Cooker pot with the garlic, onion, coconut and spices..
  3. Add the whey (or other liquid, which could be any flavour of stock or other cooking liquid). I made cheese at the weekend, so have quite a lot of whey left over, so I used whey in the recipe tonight instead of my usual chicken stock. The whey adds a much sweeter flavour, and the white wine vinegar complements this to produce a balanced sweet and sour flavour..
  4. Layer the vegetables on top - I used carrot and pepper tonight. Carrot works particularly well in this, producing a really sweet taste. The texture of carrot remains if you chop these roughly rather than into think slices..
  5. You can also add some meat, such as slices of ham or chorizo, but I prefer this as a vegetarian dish..
  6. That's it - press "cook" on the Perfect Cooker..
  7. You can leave it to complete cooking undisturbed, but I generally give it a stir after about 10 minutes to stop lentils sticking to the bottom..
  8. Spoon on to a plate/bowl top serve..
  9. Optionally, add yoghurt and spinach leaves on top..

So that's going to wrap it up with this exceptional food lentil & whey curry (perfect cooker recipe) recipe. Thanks so much for reading. I'm confident that you can make this at home. There is gonna be more interesting food in home recipes coming up. Remember to save this page in your browser, and share it to your loved ones, friends and colleague. Thank you for reading. Go on get cooking!

Steps to Prepare Quick Cranberry Salad

Steps to Prepare Quick Cranberry Salad

Cranberry Salad.

Cranberry Salad

Hello everybody, hope you are having an amazing day today. Today, we're going to make a distinctive dish, cranberry salad. It is one of my favorites. For mine, I'm gonna make it a bit unique. This is gonna smell and look delicious.

Cranberry Salad is one of the most well liked of current trending meals in the world. It is simple, it's quick, it tastes yummy. It's appreciated by millions every day. They're nice and they look wonderful. Cranberry Salad is something that I have loved my entire life.

To get started with this particular recipe, we must first prepare a few components. You can have cranberry salad using 8 ingredients and 5 steps. Here is how you can achieve that.

The ingredients needed to make Cranberry Salad:

  1. {Take 1 1/2 cup of Boiling Water.
  2. {Prepare 1 can of jellied cranberry sauce (with cranberries broken up).
  3. {Take 1 can of Crushed Pineapple.
  4. {Prepare 2 of small Apples chopped.
  5. {Get 1/2 cup of Walnuts chopped.
  6. {Take 1 cup of Celery diced.
  7. {Get of Either 6oz Raspberry jello.
  8. {Prepare of or 1 3oz black cherry & 1 3oz cranberry jello.

Instructions to make Cranberry Salad:

  1. Dissolve the jello in the hot water then add.
  2. 1 can jellied cranberry sauce (break up), when most of the cranberry sauce is dissolved add.
  3. 1 can crushed Pineapple, 2 chopped apples and chopped nuts..
  4. Refrigerate for at least 10 hours.
  5. The texture of this salad is watery and not a mold..

So that's going to wrap it up with this exceptional food cranberry salad recipe. Thanks so much for your time. I'm confident that you will make this at home. There's gonna be interesting food in home recipes coming up. Don't forget to save this page on your browser, and share it to your loved ones, friends and colleague. Thank you for reading. Go on get cooking!

Recipe of Homemade Stuffed Squash

Recipe of Homemade Stuffed Squash

Stuffed Squash.

Stuffed Squash

Hey everyone, I hope you're having an incredible day today. Today, I'm gonna show you how to make a special dish, stuffed squash. It is one of my favorites food recipes. For mine, I will make it a little bit unique. This is gonna smell and look delicious.

Stuffed Squash is one of the most favored of current trending meals on earth. It is appreciated by millions daily. It's easy, it is fast, it tastes delicious. Stuffed Squash is something that I've loved my whole life. They're nice and they look fantastic.

To get started with this recipe, we must first prepare a few ingredients. You can cook stuffed squash using 15 ingredients and 3 steps. Here is how you can achieve that.

The ingredients needed to make Stuffed Squash:

  1. {Make ready 2 of Diced skinless tomato.
  2. {Take 1 of hot pepper Chopped fine.
  3. {Get 2 Cups of rice uncle Ben Rinsed And soaked for half hour.
  4. {Get 500 g of ground meat beef.
  5. {Prepare 1 tablespoon of salt 1 tablespoon of pepper.
  6. {Take 1 tablespoon of allspice.
  7. {Get 1 teaspoon of dry mint.
  8. {Get 1 teaspoon of cumin.
  9. {Prepare 4 tablespoon of tomatoes paste.
  10. {Prepare 4 tablespoon of oil.
  11. {Take 20 of squash.
  12. {Prepare of The sauce.
  13. {Make ready 6 cups of broth beef or chicken.
  14. {Take 2 cups of tomatoes sauce.
  15. {Prepare 4 tablespoon of tomatoes paste.

Instructions to make Stuffed Squash:

  1. Core the squash.
  2. Mix all the ingredients start Filling the squash not all the way almost the 3/4 of the squash.
  3. In a deep pot lay all the squash add the hot broth tomato sauce paste mix and cook on high for 10 minutes then change the heat to medium low for 45 minutes enjoy.

So that's going to wrap it up for this special food stuffed squash recipe. Thank you very much for reading. I'm confident that you will make this at home. There is gonna be interesting food at home recipes coming up. Remember to save this page in your browser, and share it to your loved ones, friends and colleague. Thanks again for reading. Go on get cooking!

Recipe of Any-night-of-the-week Double braided egg
bread #myhomebreadrecipe

Recipe of Any-night-of-the-week Double braided egg bread #myhomebreadrecipe

Double braided egg bread #myhomebreadrecipe. Center this braid on top of the shorter braid on the baking sheet. Pinch ends to seal and tuck under. This is a large, lovely egg bread, braided and sprinkled with sesame seeds.

Double braided egg bread #myhomebreadrecipe Turn dough over to grease both sides. Cover and let rise in a warm, dark place until doubled in volume, approximately. Roll dough into three long strands.

Hello everybody, hope you're having an incredible day today. Today, I'm gonna show you how to prepare a special dish, double braided egg bread #myhomebreadrecipe. One of my favorites. This time, I am going to make it a little bit tasty. This will be really delicious.

Center this braid on top of the shorter braid on the baking sheet. Pinch ends to seal and tuck under. This is a large, lovely egg bread, braided and sprinkled with sesame seeds.

Double braided egg bread #myhomebreadrecipe is one of the most favored of recent trending meals on earth. It's easy, it's quick, it tastes delicious. It's enjoyed by millions every day. They are fine and they look fantastic. Double braided egg bread #myhomebreadrecipe is something that I've loved my entire life.

To get started with this particular recipe, we have to prepare a few ingredients. You can cook double braided egg bread #myhomebreadrecipe using 11 ingredients and 15 steps. Here is how you cook it.

The ingredients needed to make Double braided egg bread #myhomebreadrecipe:

  1. {Make ready 3-1/4 of to 3-3/4 Cups All-Purpose Flour.
  2. {Get 1 Tablespoon of Sugar.
  3. {Get 1 Package (1/4 ounce) of active dry yeast.
  4. {Prepare 3/4 Teaspoon of Salt.
  5. {Take 3/4 Cup of Water.
  6. {Prepare 3 Tablespoons of Canola Oil (i used Vegetable Oil).
  7. {Get 2 of eggs.
  8. {Take of For the Topping.
  9. {Make ready 1 of Egg.
  10. {Take 1 Teaspoon of Water.
  11. {Get 1/2 Teaspoon of Poppy Seeds.

Braid the strands, tucking ends under. Cover with towel and let double in bulk. These step-by-step photo instructions will help you make braided egg bread known by various Eastern European names. This video gives you the easiest method to make bread omelette using double eggs.

Instructions to make Double braided egg bread #myhomebreadrecipe:

  1. Sieve the All Purpose Flour into a large bowl. Pour 2 1/2 Cups of the All Purpose Flour in a bowl. Add the Yeast, Sugar and Salt. Mix until well incorporated.
  2. Add the beaten egg.
  3. Heat the water and Canola oil to 120 degrees celcious. Add the water into the flour and egg mixture.
  4. With a hand mixture on medium speed using the hooks attachment start beating the mixture.
  5. Once the mixture starts to combine add in the remaining 1 1/2 Cups All Purpose Flour and keep beating. Increase speed and keep beating the mixture as it begins to firm up. The dough is almost ready when it starts lifting of the sides of the bowl and it is no longer sticky.
  6. Take the dough out of the bowl. Lightly flour a board and start kneading the dough with your hand.
  7. Knead the dough for 8 minutes. Do not estimate the time, it has to be the full 8 minutes.
  8. Oil a bowl and put your bread dough inside. -Oil the dough too. Cover the bowl with a kitchen towel and keep in a warm place to rise for 1 1/2 hours.
  9. After the 1 1/2 hours, the dough will have doubled in size. Punch it down before proceeding.
  10. Dived the dough into two, one should be 3/4 (the big size)and the other 1/4 (the small size). Take the bigger size and divide into three. Roll them out into strips of the same size. Do the same with the smaller sized dough.
  11. Take the three strips that you rolled out and braid each of the doughs (the big and small dough). Pinch the ends to secure the braids.
  12. Grease your Bread Pan. Place the two braided dough in the pan. Pinch the ends so that the two are connected and tuck under. Cover the bread pan, place in a warm place for it to rise for 30 minutes.
  13. After 30 minutes the dough will have doubled in size. In a bowl mix the egg with some water and brush over the braided dough. Sprinkle with the Poppy Seeds and bake in the Oven for 25-30 minutes at 375 F.
  14. Leave your bread to cool before slicing into it.
  15. Spread your favorite condiment like jam, peanut butter or blue band and enjoy!.

Egg Bread is one of my favorite homemade bread recipes to bake, though I only seem to make it for special occasions. You can freeze the whole loaf or a few slices. Again, make sure that it's double-wrapped in plastic. Using the two long pieces of dough, form a loosely braided ring, leaving spaces for the five colored eggs. Seal the ends of the ring together and use your fingers to slide the eggs between the braids of dough.

So that is going to wrap it up with this exceptional food double braided egg bread #myhomebreadrecipe recipe. Thank you very much for your time. I'm confident you can make this at home. There is gonna be interesting food at home recipes coming up. Don't forget to save this page in your browser, and share it to your loved ones, colleague and friends. Thank you for reading. Go on get cooking!

How to Make Perfect Fried Brinjal and pumpkin

How to Make Perfect Fried Brinjal and pumpkin

Fried Brinjal and pumpkin.

Fried Brinjal and pumpkin

Hey everyone, I hope you are having an incredible day today. Today, I will show you a way to make a distinctive dish, fried brinjal and pumpkin. One of my favorites food recipes. For mine, I'm gonna make it a bit unique. This is gonna smell and look delicious.

Fried Brinjal and pumpkin is one of the most popular of current trending foods on earth. It is appreciated by millions every day. It's simple, it is quick, it tastes yummy. Fried Brinjal and pumpkin is something that I've loved my whole life. They're nice and they look fantastic.

To get started with this recipe, we have to prepare a few ingredients. You can have fried brinjal and pumpkin using 5 ingredients and 3 steps. Here is how you can achieve that.

The ingredients needed to make Fried Brinjal and pumpkin:

  1. {Get 1 of Brinjal sliced.
  2. {Take 1/4 of pumpkin cut into slices.
  3. {Prepare 1/2 tsp of turmeric powder.
  4. {Take To taste of salt and sugar.
  5. {Make ready as needed of oil.

Instructions to make Fried Brinjal and pumpkin:

  1. Matinate the brinjals and pumpkin slices with salt,turmeric and sugar.
  2. Heat oil and fry well.
  3. Serve it with rice and daal or khichdi.

So that is going to wrap this up with this exceptional food fried brinjal and pumpkin recipe. Thanks so much for reading. I'm confident that you will make this at home. There's gonna be interesting food in home recipes coming up. Remember to bookmark this page in your browser, and share it to your loved ones, colleague and friends. Thanks again for reading. Go on get cooking!

Recipe of Ultimate Chicken Macaroni Salad

Recipe of Ultimate Chicken Macaroni Salad

Chicken Macaroni Salad.

Chicken Macaroni Salad

Hey everyone, I hope you are having an amazing day today. Today, I will show you a way to prepare a distinctive dish, chicken macaroni salad. It is one of my favorites. This time, I'm gonna make it a bit unique. This is gonna smell and look delicious.

Chicken Macaroni Salad is one of the most favored of current trending foods in the world. It is simple, it is fast, it tastes delicious. It is appreciated by millions every day. Chicken Macaroni Salad is something which I've loved my whole life. They're nice and they look wonderful.

To begin with this recipe, we must prepare a few components. You can cook chicken macaroni salad using 11 ingredients and 3 steps. Here is how you can achieve it.

The ingredients needed to make Chicken Macaroni Salad:

  1. {Make ready 200 gms of elbow macaroni, cooked.
  2. {Prepare 1/2 of chicken breast, boiled and shredded.
  3. {Make ready 1 of carrot, peeled and diced.
  4. {Make ready 1/2 of green bell pepper, diced.
  5. {Get 3 tbsp of diced pickles.
  6. {Prepare 1/2 cup of raisins, washed.
  7. {Prepare 1 of small onion, grated to fine pieces.
  8. {Get 2 cups of mayonnaise.
  9. {Take 1 cup of cheddar cheese, diced.
  10. {Get 1 of apple, peeled and diced.
  11. {Prepare of Salt and peper to taste.

Instructions to make Chicken Macaroni Salad:

  1. Cut and clean chicken, bring to boil with little salt.
  2. With the same pot and water from boiked chicken, cooked the macaroni, according to packaging, drain.
  3. Combine all ingredients, make sure mayonnaise will coat all ingredients. Add salt and pepper to taste..

So that's going to wrap it up for this special food chicken macaroni salad recipe. Thanks so much for reading. I'm sure that you can make this at home. There is gonna be more interesting food at home recipes coming up. Remember to save this page on your browser, and share it to your loved ones, colleague and friends. Thanks again for reading. Go on get cooking!